
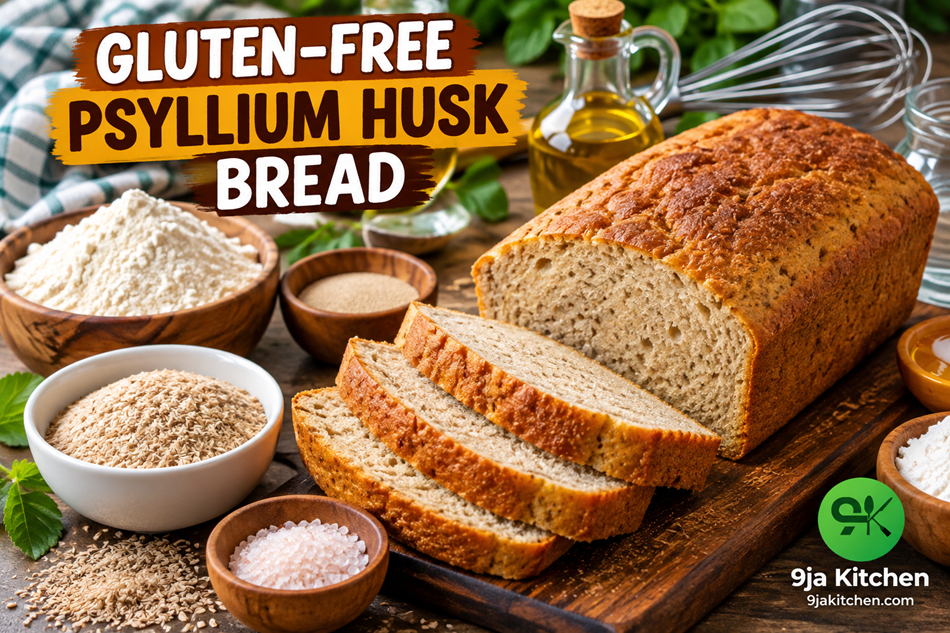

Discover how to make delicious Gluten-Free Psyllium Husk Bread at home. This easy, high-fibre loaf is soft, hearty and dairy-free, perfect for sandwiches, toast, breakfast and everyday meals.
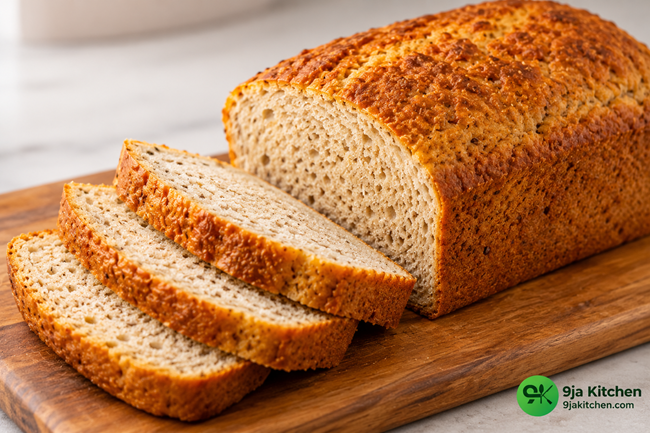
If you’re searching for a soft, flexible, flavorful, and nutrient-rich loaf that fits perfectly into gluten-free baking, you’ll love this Gluten-Free Psyllium Husk Bread. This bread is exceptionally moist, sturdy, and satisfying—thanks to the incredible binding properties of psyllium husk. The recipe is ideal for individuals seeking a gluten-free bread alternative that tastes wholesome, slices beautifully, and holds up perfectly for toast, sandwiches, and everyday use.
What makes Gluten-Free Psyllium Husk Bread stand out is its unique texture. Many gluten-free loaves crumble easily, but psyllium husk acts as a natural binder, giving the bread a springy, elastic structure similar to wheat-based bread. Also, this recipe aligns perfectly with clean eating, high-fiber meal plans, digestive health, and gluten sensitivity diets.
Throughout this comprehensive guide, you will explore how to make Gluten-Free Psyllium Husk Bread in a simple, foolproof way. From ingredients to equipment, from step-by-step instructions to nutritional benefits, you’ll find everything needed for consistent baking success.
Table of Contents
💛Why You’ll Love This Recipe
This Gluten-Free Psyllium Husk Bread is:
- Naturally gluten-free and dairy-free, ideal for people with intolerances
- A high-fiber bread recipe that supports digestion and fullness
- A simple, affordable recipe you can make at home
- Perfect for sandwiches, breakfast toast, garlic bread, or meal prep
- Made with clean ingredients like psyllium husk, olive oil, and gluten-free flour
- A reliable loaf that does not fall apart like many gluten-free options
- Rich, hearty, and incredibly nourishing
Most importantly, Gluten-Free Psyllium Husk Bread is empowering—you get full control over what you eat and can enjoy bakery-quality bread from your home kitchen.
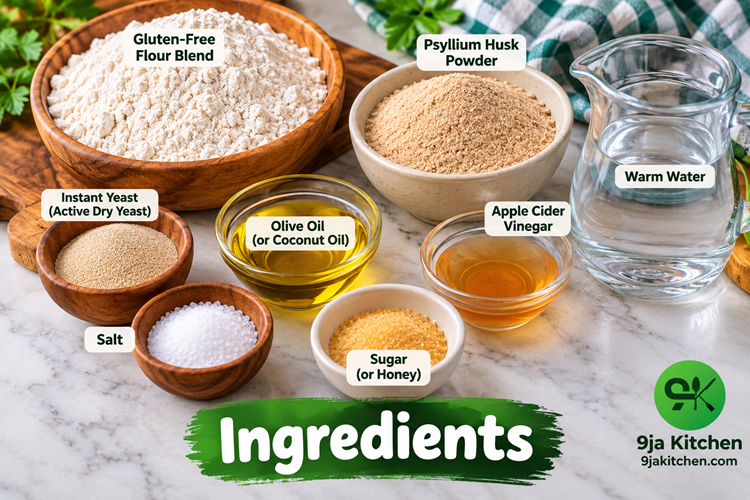
🛒 Ingredients Needed — Gluten-Free Psyllium Husk Bread
This quantity makes 1 standard loaf, approximately 10–12 slices.
- 🌾 2½ cups (300 g) gluten-free flour blend: Use a good-quality all-purpose gluten-free flour blend containing ingredients such as rice flour, tapioca starch, or potato starch.
- 🌱 3 tablespoons (24 g) psyllium husk powder: This is the key ingredient that gives the loaf structure, elasticity, and a bread-like texture.
- 💧 1¾ cups (420 ml) warm water: Use warm, not hot, water to hydrate the psyllium and activate the yeast without damaging it.
- 🍞 2¼ teaspoons (7 g) instant or active dry yeast: Provides the rise and gives the bread its familiar yeast-bread flavour.
- 🍯 1 tablespoon (15 g) honey or granulated sugar: Adds a subtle sweetness and helps support yeast activity.
- 🫒 2 tablespoons (30 ml) extra-virgin olive oil: Adds moisture and tenderness while helping create a softer crumb.
- 🍎 1 tablespoon (15 ml) apple cider vinegar: Helps improve the dough’s structure and contributes a pleasant balance of flavour.
- 🧂 1 teaspoon (6 g) fine salt: Enhances the flavour of the bread and balances the sweetness.
📝 Optional Toppings
- 🌻 1 tablespoon (10 g) sunflower seeds: Adds crunch and a nutty flavour to the crust.
- 🎃 1 tablespoon (10 g) pumpkin seeds: Gives the loaf extra texture and visual appeal.
- 🌿 1 teaspoon dried mixed herbs: Optional for a savoury herb-infused loaf.
🧰 Equipment Needed
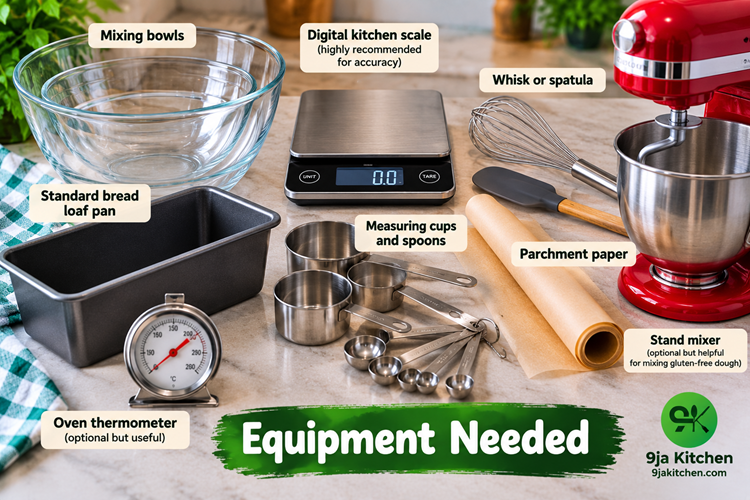
You’ll need the following equipment to make Gluten-Free Psyllium Husk Bread:
- Mixing bowls
- Digital kitchen scale (highly recommended for accuracy)
- Whisk or spatula
- Standard bread loaf pan
- Measuring cups and spoons
- Parchment paper
- Oven thermometer (optional but useful)
- Stand mixer (optional but helpful for mixing gluten-free dough)
👩🍳Step-by-Step Guide: How To Make Gluten-Free Psyllium Husk Bread
Cooking Instructions:
Follow these detailed steps carefully to make perfect Gluten-Free Psyllium Husk Bread every single time.
Step 1: Prepare the Psyllium Gel Mixture
- In a bowl, add the warm water.
- Whisk in the psyllium husk powder thoroughly.
- Let the mixture sit for approximately 2–3 minutes until it forms a thick gel.
- This gel provides much of the structure and elasticity needed for the bread.
Step 2: Activate the Yeast
- Add the yeast, honey or sugar and a portion of the warm water to a separate bowl.
- Stir gently to combine.
- Allow the mixture to stand for approximately 5–10 minutes.
- The yeast should become active and slightly foamy.
Step 3: Combine the Dry Ingredients
- Add the gluten-free flour blend and salt to a large mixing bowl.
- Whisk thoroughly to distribute the salt evenly.
- Break up any lumps before adding the wet ingredients.
Step 4: Add the Wet Ingredients
- Pour the psyllium gel into the dry ingredients.
- Add the activated yeast mixture.
- Add the olive oil and apple cider vinegar.
- Mix thoroughly using a spatula or stand mixer until a cohesive dough forms.
The dough will be considerably stickier than conventional wheat bread dough. Avoid adding excessive flour, as this can make the finished loaf dry and dense.
Step 5: Form the Dough and Rest
- The dough should be soft, sticky and slightly stretchy.
- If it appears unusually dry, add warm water one tablespoon at a time.
- Allow the dough to rest for approximately 10 minutes.
- This gives the gluten-free flour and psyllium time to absorb the available moisture.
Step 6: Shape the Dough
- Line a standard loaf pan with parchment paper.
- Transfer the dough into the prepared pan.
- Smooth the surface using a damp spatula or wet hands.
- Make sure the dough is distributed evenly throughout the pan.
- Cover the pan loosely with a clean kitchen towel.
Step 7: Allow the Dough to Rise
- Place the covered loaf pan in a warm, draught-free area.
- Allow the dough to rise for approximately 45–60 minutes.
- The dough should increase in volume by roughly 50%.
- Avoid waiting for it to double completely, as excessive proofing can negatively affect the structure of gluten-free bread.
Step 8: Bake the Bread
- Preheat your oven to 180°C (350°F).
- Remove the towel from the loaf pan.
- Place the pan in the centre of the preheated oven.
- Bake for approximately 55–65 minutes.
- The crust should become golden brown and feel firm.
- For the most reliable result, check the centre with a food thermometer. Aim for an internal temperature of approximately 96°C (205°F).
Step 9: Cool Completely
- Remove the loaf from the oven.
- Carefully lift it from the pan using the parchment paper.
- Transfer the bread to a wire cooling rack.
- Allow it to cool completely before slicing.
- Ideally, wait at least 1 hour before cutting into the loaf.
Gluten-free bread continues to set as it cools. Cutting it too early can result in a gummy centre or cause the slices to crumble.
✅Your Gluten-Free Psyllium Husk Bread is ready to enjoy!🎉

💡Tips for the Perfect Gluten-Free Psyllium Husk Bread
- Always let the bread cool fully for clean slices.
- Use psyllium husk powder, not whole husk.
- A digital scale ensures balanced moisture levels.
- Add herbs, garlic, or seeds for flavour variations.
- Store in an airtight container for 3–4 days.
- Freeze sliced bread for easy meal prep.
🍽️Serving Suggestions
Enjoy your Gluten-Free Psyllium Husk Bread with:
- Avocado slices
- Almond or peanut butter
- Egg scramble or omelette
- Grilled vegetables
- Smoked salmon
- Healthy sandwich fillings
- Garlic butter or vegan spreads
🔀 Variations
- Herb & Garlic Bread: Add oregano, garlic powder, and thyme for a fragrant loaf.
- Seeded Psyllium Bread: Top with sesame, sunflower, or pumpkin seeds for crunch.
- Coconut-Oil Variant: Replace olive oil with coconut oil for a subtle sweetness.
- Protein Boost Version: Add 2 tablespoons of flaxseed meal or hemp seed.
🍞 Recipe at a Glance
- ⏱️ Prep Time: 20 minutes
- ⏳ Rising Time: 45–60 minutes
- 🔥 Baking Time: 55–65 minutes
- 🕐 Total Time: About 2 hours 15 minutes
- 🍞 Yield: 1 loaf (10–12 slices)
- 🌾 Cuisine: Gluten-Free / Homemade Baking
- 🌱 Diet: Gluten-Free, Dairy-Free
- 🔥 Oven Temperature: 180°C (350°F)
- 🥣 Main Ingredient: Gluten-free flour blend and psyllium husk powder
- 💪 Key Feature: High-fibre, sturdy loaf with a soft, flexible crumb
- ❄️ Storage: Store airtight for several days or slice and freeze for longer storage
- 🍽️ Best For: Toast, sandwiches, breakfast and everyday meals
Gluten-Free Psyllium Husk Bread Recipe
Equipment
- 1 Mixing Bowls
- 1 Digital kitchen scale
- 1 Whisk or spatula
- 1 Standard bread loaf pan
- 1 Measuring Cups and Spoons –
- 1 Parchment paper
- 1 Oven thermometer
- 1 Stand mixer
Ingredients
- 2½ cups 300 g gluten-free flour blend
- 3 tablespoons 24 g psyllium husk powder
- 1¾ cups 420 ml warm water
- 2¼ teaspoons 7 g instant or active dry yeast
- 1 tablespoon 15 g honey or granulated sugar
- 2 tablespoons 30 ml extra-virgin olive oil
- 1 tablespoon 15 ml apple cider vinegar
- 1 teaspoon 6 g fine salt
Optional Toppings
- 1 tablespoon 10 g sunflower seeds
- 1 tablespoon 10 g pumpkin seeds
- 1 teaspoon dried mixed herbs
Instructions
Step 1: Prepare the Psyllium Gel Mixture
- In a bowl, add the warm water.
- Whisk in the psyllium husk powder thoroughly.
- Let the mixture sit for approximately 2–3 minutes until it forms a thick gel.
- This gel provides much of the structure and elasticity needed for the bread.
Step 2: Activate the Yeast
- Add the yeast, honey or sugar and a portion of the warm water to a separate bowl.
- Stir gently to combine.
- Allow the mixture to stand for approximately 5–10 minutes.
- The yeast should become active and slightly foamy.
Step 3: Combine the Dry Ingredients
- Add the gluten-free flour blend and salt to a large mixing bowl.
- Whisk thoroughly to distribute the salt evenly.
- Break up any lumps before adding the wet ingredients.
Step 4: Add the Wet Ingredients
- Pour the psyllium gel into the dry ingredients.
- Add the activated yeast mixture.
- Add the olive oil and apple cider vinegar.
- Mix thoroughly using a spatula or stand mixer until a cohesive dough forms.
- The dough will be considerably stickier than conventional wheat bread dough. Avoid adding excessive flour, as this can make the finished loaf dry and dense.
Step 5: Form the Dough and Rest
- The dough should be soft, sticky and slightly stretchy.
- If it appears unusually dry, add warm water one tablespoon at a time.
- Allow the dough to rest for approximately 10 minutes.
- This gives the gluten-free flour and psyllium time to absorb the available moisture.
Step 6: Shape the Dough
- Line a standard loaf pan with parchment paper.
- Transfer the dough into the prepared pan.
- Smooth the surface using a damp spatula or wet hands.
- Make sure the dough is distributed evenly throughout the pan.
- Cover the pan loosely with a clean kitchen towel.
Step 7: Allow the Dough to Rise
- Place the covered loaf pan in a warm, draught-free area.
- Allow the dough to rise for approximately 45–60 minutes.
- The dough should increase in volume by roughly 50%.
- Avoid waiting for it to double completely, as excessive proofing can negatively affect the structure of gluten-free bread.
Step 8: Bake the Bread
- Preheat your oven to 180°C (350°F).
- Remove the towel from the loaf pan.
- Place the pan in the centre of the preheated oven.
- Bake for approximately 55–65 minutes.
- The crust should become golden brown and feel firm.
- For the most reliable result, check the centre with a food thermometer. Aim for an internal temperature of approximately 96°C (205°F).
Step 9: Cool Completely
- Remove the loaf from the oven.
- Carefully lift it from the pan using the parchment paper.
- Transfer the bread to a wire cooling rack.
- Allow it to cool completely before slicing.
- Ideally, wait at least 1 hour before cutting into the loaf.
- Gluten-free bread continues to set as it cools. Cutting it too early can result in a gummy centre or cause the slices to crumble.
Notes
- 🍞 Texture: Psyllium husk gives this gluten-free loaf a soft, flexible texture that holds together well when sliced.
- 🌾 Flour: Use a reliable gluten-free flour blend for the most consistent results.
- 💧 Water: Add the water gradually if needed, as psyllium husk absorbs a significant amount of liquid.
- ⏳ Cooling: Allow the bread to cool completely before slicing to prevent a gummy or crumbly centre.
- 🔪 Slicing: Use a sharp serrated bread knife for neat, even slices.
- 🧊 Storage: Store in an airtight container for several days or slice and freeze for longer storage.
- 🌱 Serving: Enjoy toasted with avocado, nut butter, eggs, vegetables, or your favourite sandwich filling.
- If using a gluten-free flour blend that already contains xanthan gum, there is generally no need to add extra xanthan gum. Also, psyllium husk powder and whole psyllium husk do not absorb liquid identically, so avoid substituting them by volume without adjusting the recipe.
🧊 Storage Instructions
- 🏠 Room temperature: Once completely cooled, store the bread in an airtight container or resealable bread bag at room temperature for up to 3 days.
- ❄️ Refrigeration: For longer freshness, wrap the loaf or individual slices tightly and refrigerate for up to 5–7 days. Allow slices to come to room temperature or toast them before serving.
- 🥶 Freezing: Slice the bread before freezing so you can remove only what you need. Wrap individual slices in freezer-safe paper or bags and freeze for up to 3 months.
- 🔥 Reheating: Toast frozen slices directly from the freezer, or warm them in a preheated oven at 160°C (320°F) for several minutes.
- 💧 Prevent moisture: Make sure the bread is completely cool before storing. Sealing warm bread can trap condensation and make the crust soggy.
- 👀 Check freshness: Discard the bread if you notice mould, an unusual smell or significant changes in texture.
📊Nutritional Information (Approx. Per Slice)
🔗Source: Norwegian Food Safety Authority↗
| Nutrient | Amount | % DV |
|---|---|---|
| Calories | 135 | 7% |
| Total Fat | 4g | 5% |
| Carbohydrates | 22g | 8% |
| Dietary Fiber | 7g | 25% |
| Protein | 3g | 6% |
| Sodium | 210mg | 9% |
| Iron | 1.2mg | 7% |
| Calcium | 27mg | 2% |
🌿Health Benefits & Advice
This Gluten-Free Psyllium Husk Bread is rich in dietary fiber, making it excellent for digestion, gut motility, and blood sugar balance.
Health benefits include:
- Supports digestive health due to psyllium’s soluble fiber
- Helps regulate blood sugar and cholesterol
- Keeps you full longer, aiding weight management
- Gluten-free baking is ideal for celiac and gluten-sensitive individuals
- Promotes heart health thanks to fiber-rich ingredients
- Lowers inflammation through clean, whole-food components
Tip: Drink plenty of water when consuming high-fiber foods.
Note: The information provided in this blog post is for educational purposes only and is not intended as medical advice. Always consult with a healthcare professional before making significant changes to your diet.
❓Frequently Asked Questions
1. Can I make this bread without yeast?
👉Yes. Replace yeast with 1 teaspoon of baking powder and 1 teaspoon of baking soda, but texture will differ.
2. Can I slice the bread when warm?
It’s best to let Gluten-Free Psyllium Husk Bread cool completely to prevent crumbling.
3. Why is my bread dense?
👉Too little water or not enough psyllium gel can prevent proper rise.
4. Can I freeze this bread?
👉Absolutely. Slice first and freeze for up to 3 months.
5. Can I use whole psyllium husk?
👉No. It must be psyllium husk powder for proper texture.
🏁Final Thoughts
Making Gluten-Free Psyllium Husk Bread at home is empowering, healthy, and cost-effective. This loaf delivers the perfect blend of flavour, structure, and nutrition—making it suitable for everyone seeking a wholesome gluten-free baking experience. With psyllium husk acting as a natural binder, you can finally enjoy a bread that slices beautifully, toasts perfectly, and enhances any meal of the day.
- How to Make Mango Coconut Milk Drink: A Delicious Tropical Delight🥭🥥🥤
- Amazing Salad Recipes: 120+ Fresh & Healthy Ideas to Try Today🥗
- 47 Delicious High-Protein Recipes for All-Day Energy and Strength💪🥑
- Ultimate Delicious Shawarma Recipes You’ll Crave Daily 🌯✨
- 180+ Garlic Recipes: The Irresistible Flavour-Packed Guide You’ll Love🧄🌟

Did you make this recipe? Please do leave a comment and rating on the blog. Tag us on Pinterest @9jakitchen and Instagram @real9jakitchen, and follow.