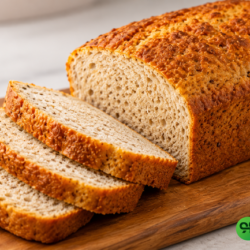
Gluten-Free Psyllium Husk Bread Recipe
🍞 This Gluten-Free Psyllium Husk Bread is a soft, hearty and satisfying homemade loaf made with psyllium husk for added fibre and a beautifully sturdy texture. Perfect for toast, sandwiches and everyday meals, it’s an easy gluten-free baking recipe that delivers delicious, wholesome results.
Equipment
- 1 Mixing Bowls
- 1 Digital kitchen scale
- 1 Whisk or spatula
- 1 Standard bread loaf pan
- 1 Measuring Cups and Spoons –
- 1 Parchment paper
- 1 Oven thermometer
- 1 Stand mixer
Ingredients
- 2½ cups 300 g gluten-free flour blend
- 3 tablespoons 24 g psyllium husk powder
- 1¾ cups 420 ml warm water
- 2¼ teaspoons 7 g instant or active dry yeast
- 1 tablespoon 15 g honey or granulated sugar
- 2 tablespoons 30 ml extra-virgin olive oil
- 1 tablespoon 15 ml apple cider vinegar
- 1 teaspoon 6 g fine salt
Optional Toppings
- 1 tablespoon 10 g sunflower seeds
- 1 tablespoon 10 g pumpkin seeds
- 1 teaspoon dried mixed herbs
Instructions
Step 1: Prepare the Psyllium Gel Mixture
- In a bowl, add the warm water.
- Whisk in the psyllium husk powder thoroughly.
- Let the mixture sit for approximately 2–3 minutes until it forms a thick gel.
- This gel provides much of the structure and elasticity needed for the bread.
Step 2: Activate the Yeast
- Add the yeast, honey or sugar and a portion of the warm water to a separate bowl.
- Stir gently to combine.
- Allow the mixture to stand for approximately 5–10 minutes.
- The yeast should become active and slightly foamy.
Step 3: Combine the Dry Ingredients
- Add the gluten-free flour blend and salt to a large mixing bowl.
- Whisk thoroughly to distribute the salt evenly.
- Break up any lumps before adding the wet ingredients.
Step 4: Add the Wet Ingredients
- Pour the psyllium gel into the dry ingredients.
- Add the activated yeast mixture.
- Add the olive oil and apple cider vinegar.
- Mix thoroughly using a spatula or stand mixer until a cohesive dough forms.
- The dough will be considerably stickier than conventional wheat bread dough. Avoid adding excessive flour, as this can make the finished loaf dry and dense.
Step 5: Form the Dough and Rest
- The dough should be soft, sticky and slightly stretchy.
- If it appears unusually dry, add warm water one tablespoon at a time.
- Allow the dough to rest for approximately 10 minutes.
- This gives the gluten-free flour and psyllium time to absorb the available moisture.
Step 6: Shape the Dough
- Line a standard loaf pan with parchment paper.
- Transfer the dough into the prepared pan.
- Smooth the surface using a damp spatula or wet hands.
- Make sure the dough is distributed evenly throughout the pan.
- Cover the pan loosely with a clean kitchen towel.
Step 7: Allow the Dough to Rise
- Place the covered loaf pan in a warm, draught-free area.
- Allow the dough to rise for approximately 45–60 minutes.
- The dough should increase in volume by roughly 50%.
- Avoid waiting for it to double completely, as excessive proofing can negatively affect the structure of gluten-free bread.
Step 8: Bake the Bread
- Preheat your oven to 180°C (350°F).
- Remove the towel from the loaf pan.
- Place the pan in the centre of the preheated oven.
- Bake for approximately 55–65 minutes.
- The crust should become golden brown and feel firm.
- For the most reliable result, check the centre with a food thermometer. Aim for an internal temperature of approximately 96°C (205°F).
Step 9: Cool Completely
- Remove the loaf from the oven.
- Carefully lift it from the pan using the parchment paper.
- Transfer the bread to a wire cooling rack.
- Allow it to cool completely before slicing.
- Ideally, wait at least 1 hour before cutting into the loaf.
- Gluten-free bread continues to set as it cools. Cutting it too early can result in a gummy centre or cause the slices to crumble.
Notes
- 🍞 Texture: Psyllium husk gives this gluten-free loaf a soft, flexible texture that holds together well when sliced.
- 🌾 Flour: Use a reliable gluten-free flour blend for the most consistent results.
- 💧 Water: Add the water gradually if needed, as psyllium husk absorbs a significant amount of liquid.
- ⏳ Cooling: Allow the bread to cool completely before slicing to prevent a gummy or crumbly centre.
- 🔪 Slicing: Use a sharp serrated bread knife for neat, even slices.
- 🧊 Storage: Store in an airtight container for several days or slice and freeze for longer storage.
- 🌱 Serving: Enjoy toasted with avocado, nut butter, eggs, vegetables, or your favourite sandwich filling.
- If using a gluten-free flour blend that already contains xanthan gum, there is generally no need to add extra xanthan gum. Also, psyllium husk powder and whole psyllium husk do not absorb liquid identically, so avoid substituting them by volume without adjusting the recipe.